


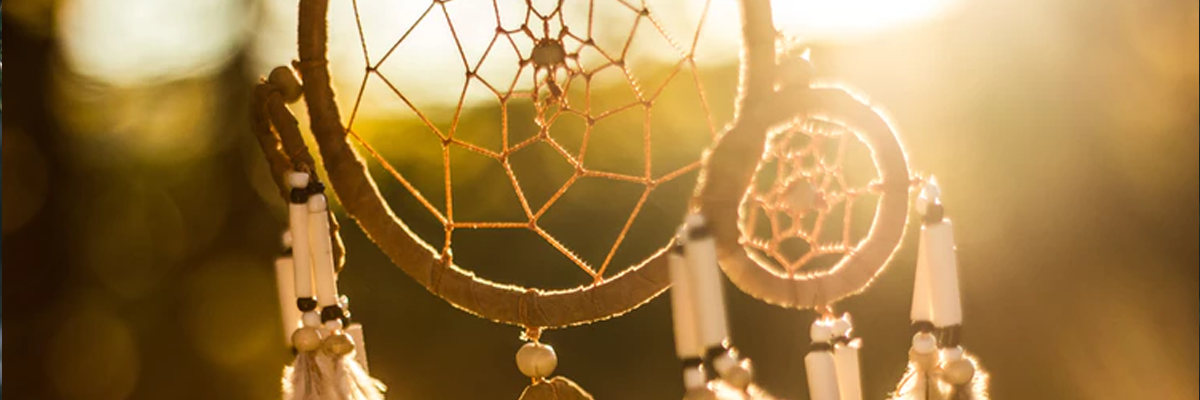
Summer Project: How to Make a Dream Catcher
Chase away the bad dreams and summer boredom with this simple dream catcher project by Suzanne McNeill in Vacation Crafting.
Dream Catcher Purpose
Some Native American tribes believe dreams are messages sent by sacred spirits. There are many legends about dream catchers. One suggests that the web captures good dreams while bad dreams dissipate through the center hole. Another version suggests that the web traps the bad dreams to be destroyed by the morning light, allowing only good dreams to pass through the center.
Vacation Crafting
Are you ready for a CRAFTY vacation? Even during the most exciting school breaks, you sometimes have an hour—or a whole afternoon— with nothing to do. The fast, fun crafts in this book are perfect whether you’re enjoying a summer afternoon at the kitchen table or you’re away from home without all your usual art supplies. You only need easy-to-pack or inexpensive materials available almost anywhere you’ll be vacation crafting with these 150 child-friendly projects for girls and boys ages 4 to 12.
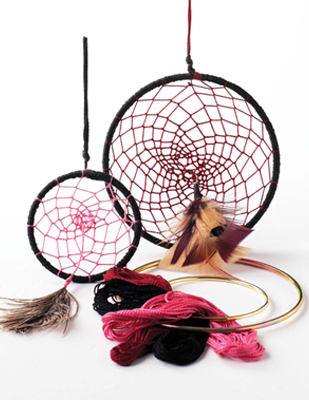
Materials
- Embroidery floss/craft thread
- 3″ (7.5cm) or 5″ (12.5cm) metal craft ring
- Size 18 needlepoint needle
- Beads or feathers
- Glue
Directions
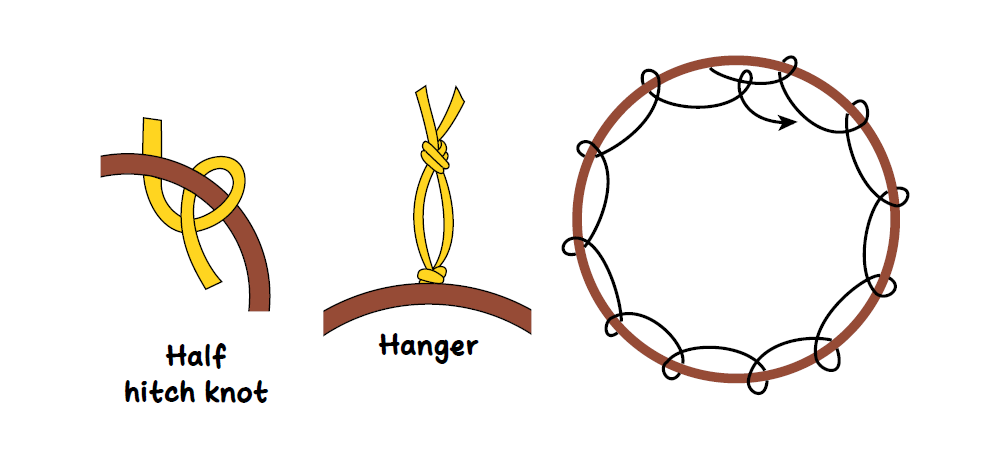
- Cut 4 yards (4m) of floss. Leaving an 8″ (20cm) tail, tie the floss to a metal ring. Wrap the ring with floss, covering it completely, and leave another 8″ (20cm) tail right next to the first one. Tie a knot snug against the ring using the two tails.
- To make the hanging loop, simply bring the tails together and tie an overhand knot.
- Cut 4 yards (4m) of floss. Tie one end to the ring. Then tie 12 halfhitches (or 20 if you are making the larger dream catcher) around the ring. Space them evenly with one exception: the space between the last half-hitch and the beginning knot needs to be smaller.
- Still using the same piece of floss, tie a half-hitch in the center of the first loop created by a half-hitch from the previous step. Continue around the web, making half-hitches in the center of each loop. Keep the floss tight. Continue going around the circle and adding increasingly smaller rows of half-hitches to the previous halfhitches. When you finish in the center, secure the floss with a knot near the center of web. Place a dot of glue on the knot.
- To finish, decorate the center with beads or a feather.
Get Exclusive Email Offers And Receive 15% OFF On Your First Book Order!

Recent Comments