


Making a Basic Caddy to Hold All Your Tools
By Casey Foster
Spring is upon us! There’s no better time to clean out your workshop and implement new organization techniques to keep your work area looking tidy all year round. Below is a tool caddy project by Casey Foster, featured in Woodcarving Illustrated Fall 2023 (Issue 104).
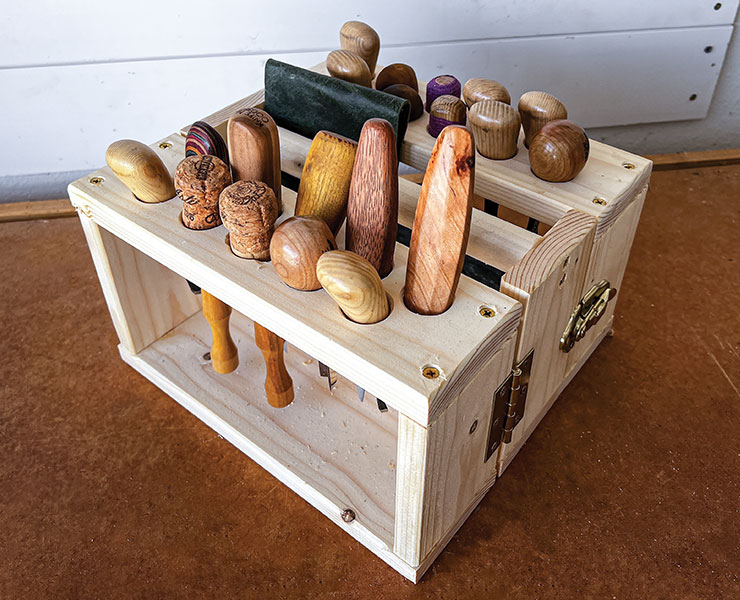
This project is a relatively simple tool tote that can be built using a small amount of lumber, screws, and a dowel. There’s nothing fancy that can’t be found at your local home center or hardware store.
Getting Started
Refer to the Parts List (in full article below) and cut your pieces to size. I suggest cutting your pieces in one batch at the beginning of the project, rather than as needed. If you have access to a power saw, this step is a breeze. Even if you don’t have a power saw, the wood can be cut easily enough with hand tools. To make relatively square cuts with a hand saw, use a miter box or a fence to guide your blade. Alternately, your local home center, hardware store, or lumber store may offer a service to cut lumber to spec.
 Drilling the Tool Holes
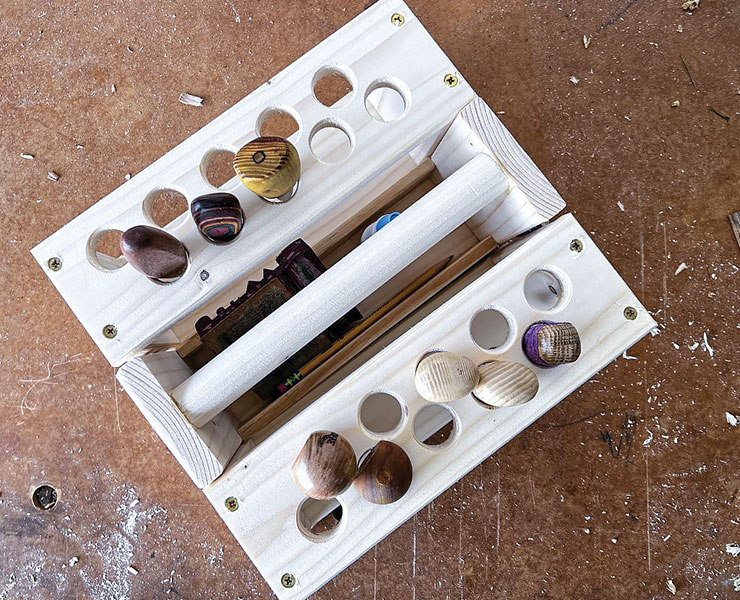
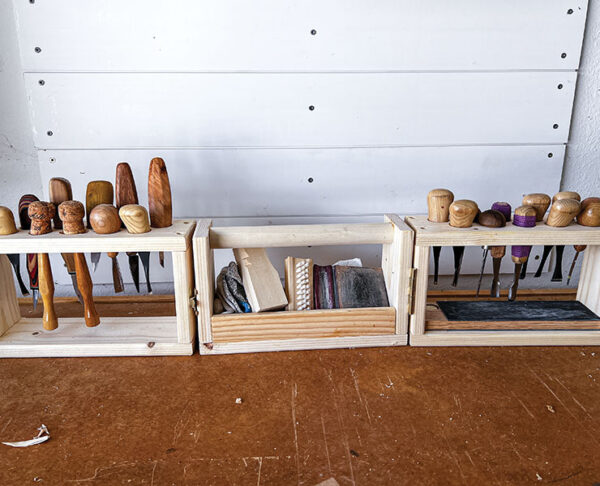
When your pieces are cut to length, you can begin laying out and drilling the tool holes. Identify your two top pieces for the box (these are interchangeable with the bottoms, so make sure to set aside two for this purpose). Use a Forstner or spade bit to bore the holes, starting 1” (2.5cm) in from the short edge of your top piece. If you are following the suggested dimensions exactly, your tote should be able to hold at least 20 tools.
If you have access to a router and ¼” (6mm) roundover bit, you can profile your tool holes for better holding power. Apply the same profile to the non-mating edges of your toolbox pieces to give it a more finished look and feel. If you don’t have access to a router, you can also do this with a gouge or sandpaper.
Tip: Create a jig for spacing your tool holes before drilling. The provided pattern works perfectly for a 1” x 4” (2.5cm x 10.2cm) pre-dimensioned board and 1” (2.5cm) holes. When using a spade or Forstner bit, drill slowly until the tip of the bit protrudes from the back of your workpiece. When this occurs, flip the piece over and finish drilling through the bottom. This ensures a clean entry and exit hole with no tear-out.
Assembling the Box
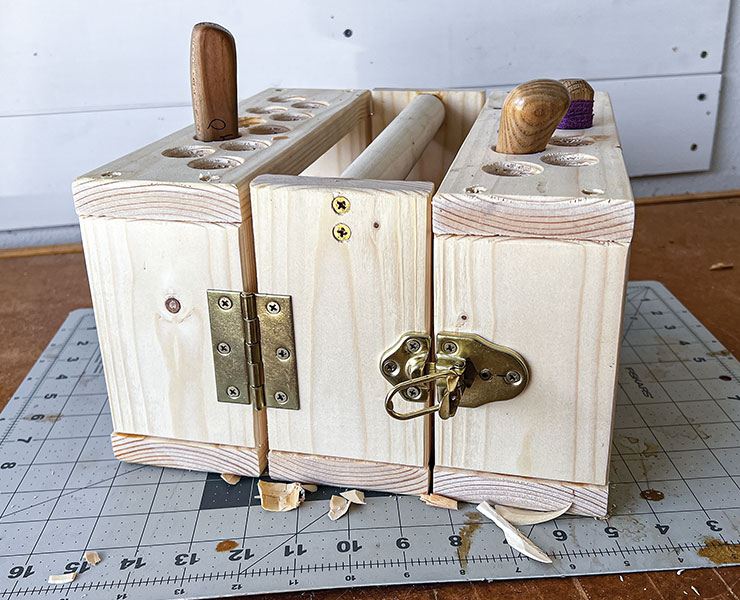
Once the tool holes are drilled and you have profiled the parts as you see fit, begin assembly. Starting with the outer sections of the tote, attach the sidewalls to the bottoms using screws and wood glue. Clamp and let dry. Then attach the tops. For the middle section of the tote, attach the long sidewalls to the bottom. Finish this portion by adding interior walls using a 1×2 board to create a storage space for glue, carving gloves, or other items you may use while carving. Next, attach the dowel handle with screws at the top of the sidewalls.
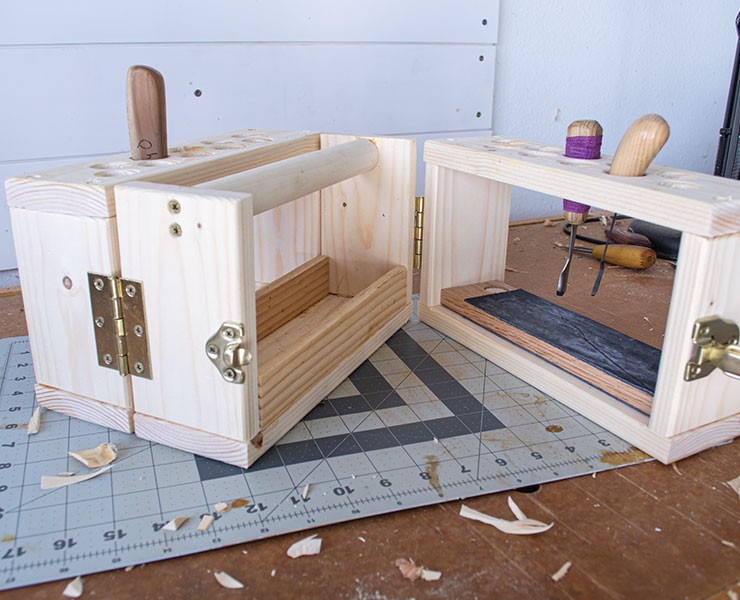
The last step in assembly is to add the hinges and latches. I suggest setting the tote on a very flat surface. Use a spacer block to ensure the hardware all sits at the same height. Attach the utility hinges and shackle latches to the sidewalls, following the directions on the packaging to ensure proper alignment. Your toolbox is now complete and ready to load up with your favorite carving tools!
Customization
Having a toolbox that opened and latched closed was specific to my storage needs. If you don’t need this feature, you can glue and screw your sidewalls and bottoms together before assembly to create a single unit tool tote without adding the latch hardware.
Materials
- Wood, such as pine, 3/4” (1.9cm) thick: tops and bottoms, 3-1/2” x 11” (8.9cm x 27.9cm)
- Wood, such as pine, 3/4” (1.9cm) thick: outer walls, 3-1/2” x 5 ” (8.9cm x 12.7cm)
- Wood, such as pine, 3/4” (1.9cm) thick: center walls, 3-1/2” x 5-3/4” (8.9cm x 14.6cm)
- Wood, such as pine, 3/4” (1.9cm) thick: interior dividers, 1-1/2” x 9-1/2” (3.8cm x 24.1cm)
- Dowel: 1” (2.5cm)-dia.: 9-1/2” long (24.1cm)
- Sandpaper: various grits (optional)
- Chest latches: two each 1-1/2” x 2-¾” (3.8cm x 7cm)
- Utility hinges: two each 2-½” (6.4cm)
- Screws: #8 1-¼” (3.2cm)
Tools
- Saws: miter, table, or hand
- Hand Drill
- Bits: Forstner or spade; 1” (25mm) spiral; assorted; ¼” (6mm) roundover (optional)
- Router: (optional)
About the Author
Casey Foster has been a member of the woodcarving community since 2020. He lives in central Florida with his wife, daughter and two dogs. You can see more of Casey’s work on Instagram @CaseyCarvesCarvings.
Enter your email below for the full article, including parts list and project pattern. Feel free to send us your finished creations at editors@woodcarvingillustrated.com or on our social media: Facebook or Instagram.

For more articles like this, subscribe to Woodcarving Illustrated magazine.
Woodcarving Illustrated magazine is published quarterly for both subscribers and newsstand readers. The editorial team passionately searches for and features interesting and creative carvers, projects, and techniques. Each issue includes inspiring feature articles and galleries showing artists stretching the art of woodcarving, comprehensive step-by-step articles outlining the steps to recreate a carving, pattern profiles to inspire more experienced readers, and reviews of the newest and most useful tools.
Get Exclusive Email Offers And Receive 15% OFF On Your First Book Order!


Recent Comments