


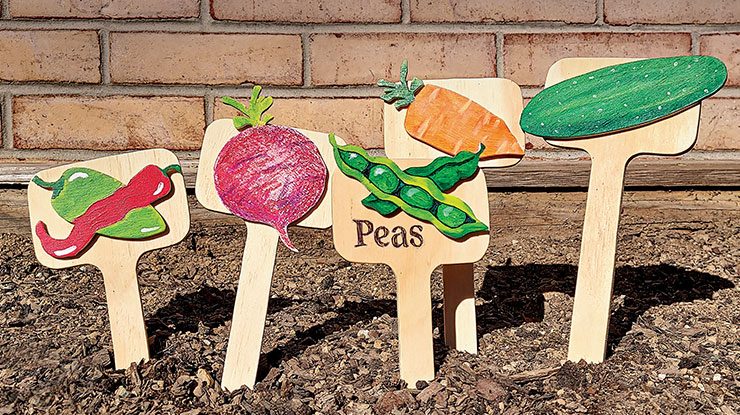
DIY GARDEN STAKE: Free Summer Scroll Saw Patterns
The season for gardening is upon us! There is no better way to welcome the warmer weather than with a family activity, gardening. The anticipation that gloomed over our garden patches throughout the gloomy winter weather is long gone as we excitedly await the bountiful greenery and colorful produce.
Join us in welcoming the summer harvest with this fun, colorful, and practical DIY Garden Stake project that was made for bonding either with your scroll saw or your family! These simple stake and vegetable cutouts are charming and rustic, making it great practice for novice scrollers or for imparting your scrolling knowledge to the younger generation of children.
Getting Started
Materials
• Exterior plywood, 1/4″ (6mm) thick: stakes, 24″ (61cm) square
• Plywood, 1/8″ (3mm) thick: cutouts, 8 1/2″ x 11″ (21.6cm x 27.9cm)
• Glue: wood, waterproof
• Tape: packaging and painter’s
• Spray adhesive
• Primer: flat white latex or gesso
• Art supplies: crayons, markers, paints
• Spar urethane, such as Helmsman®
Tools
• Scroll saw with blade: #2 modified geometry
• Drill with 1/8″ (3mm)-dia. bit
• Paintbrushes: assorted (optional)

Ready Your Scroll Saw
1. Cut the plywood into 8 1/2″ by 11″ (21.6cm by 27.9cm) panels.
2. Make copies of the pattern (if desired) and place them on the plywood pieces. Cut out the pattern onto the panels carefully to avoid cutting through the edges!
3. Cover the face of the panels with painter’s tape and apply the patterns with spray adhesive.
PRO TIP: To produce multiple stakes and vegetable cutouts, stack the cut multiple pieces of plywood. Group the stacks and tightly bind them together on all sides with packaging tape.

Bring on the color
1. Decorate your stakes and veggies as desired. You can use crayons, markers, paint, or any other colorful medium of your choice. Now’s the perfect chance for the younger kids to shine. Let them express their creativity on the cut panels.
2. Once the paint is dry, coat BOTH sides of each piece of plywood with weather-resistant clear varnish to protect your finished artwork.
3. Allow the varnish to dry and glue the vegetable cutout to the stake. Depending on your preference you can center it or place it higher on the stake.
PRO TIP: Coat the cutouts with flat white primer or gesso to ensure a bright and brilliant color.

For more articles like this, subscribe to Scroll Saw Woodworking & Crafts Magazine.
Scroll Saw Woodworking & Crafts Magazine is published quarterly for both subscribers and newsstand readers. The editorial team passionately searches for and features interesting and creative scroll saw artists, projects, and techniques. Each issue includes inspiring feature articles and galleries showing artists stretching the art of scroll sawing, comprehensive step-by-step articles outlining the steps to recreate a project, pattern profiles to inspire more experienced readers, and reviews of the newest and most useful tools
| About the Author – Jon Deck |
|
A lifelong designer and woodcrafter, Jon Deck has been the art director of Scrollsaw Woodworking & Crafts magazine for over 20 years. |

